
Compression Basics
Compression is one of the most useful tools on a mixer, and one of the easiest to misuse.
For a new audio engineer, the word itself can sound intimidating, but the basic idea is simple:
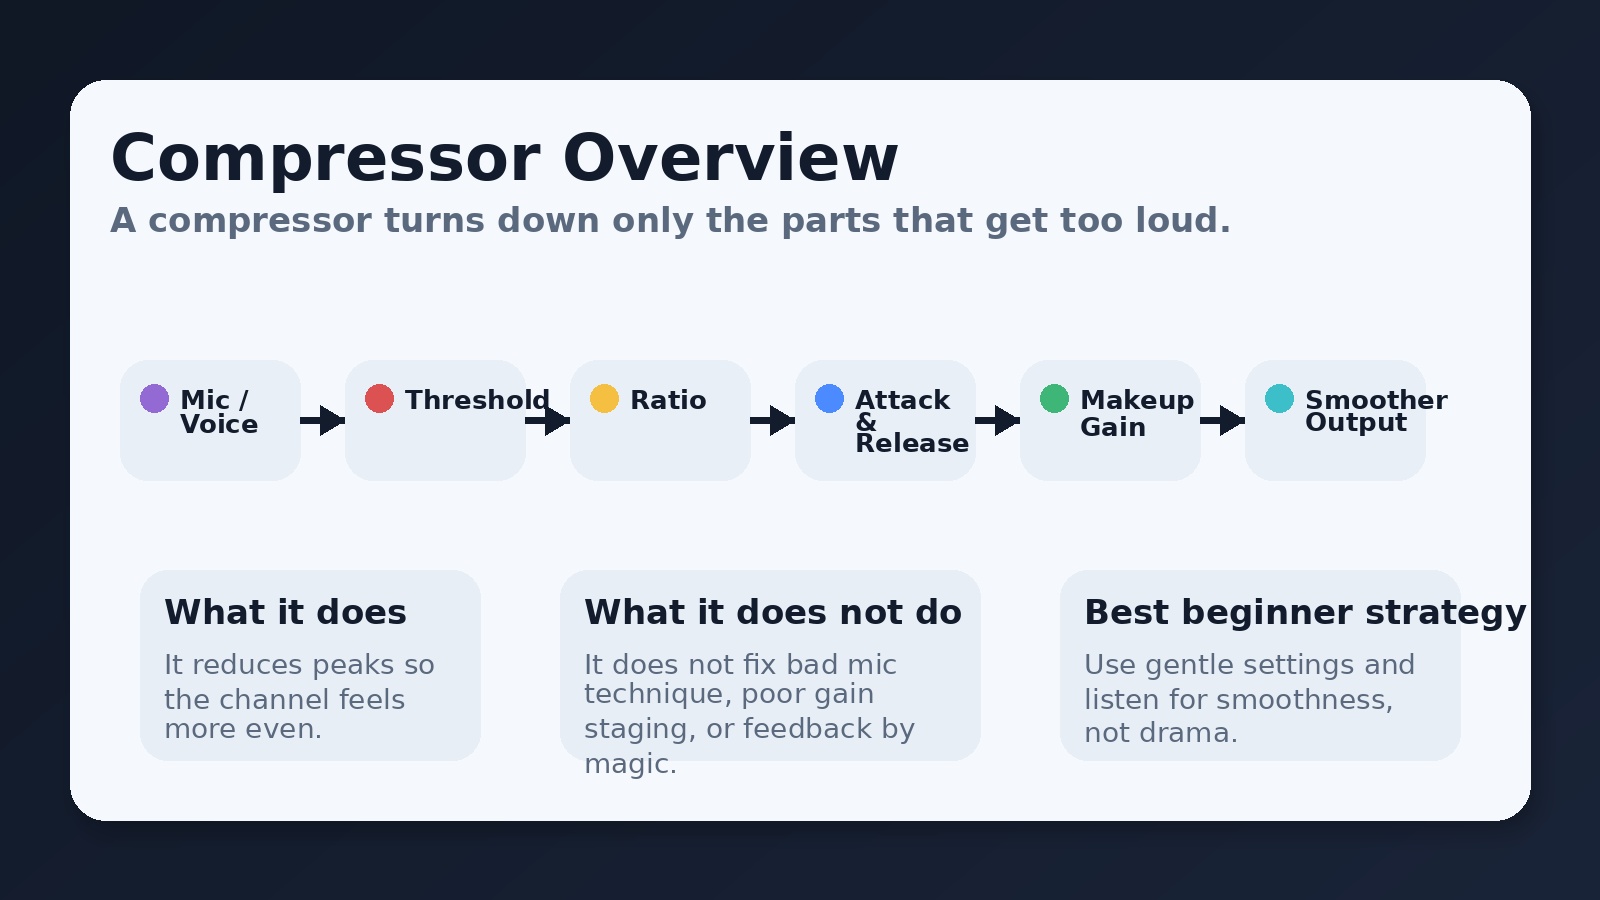
A compressor turns down only the parts of a signal that get too loud.
That is the whole creature. No dragon magic. Just level control.
When used gently, compression can help vocals sound smoother, more even, and easier to understand. That matters because the goal is not just “good sound.” The goal is clear communication.
Overview: What a Compressor Does
Think of a compressor like an automatic volume hand.
When a singer or speaker gets suddenly louder, the compressor reacts and reduces that loud part. It does not make every part of the signal the same volume. It simply controls the peaks so the channel behaves more consistently.
That means:
- soft sounds can stay soft
- normal sounds can stay normal
- loud peaks get controlled
This helps the sound feel smoother and less jumpy in the room and in the livestream.
Why this matters
CVocals and speaking voices are rarely perfectly even. A worship leader may sing softly in one phrase and then lean into the mic on the next line. A pastor may speak normally and then emphasize one sentence much louder than the rest.
Without compression, those changes can feel distracting. With gentle compression, the channel stays more stable and easier to follow.
Compression is often useful on:
- lead vocals
- speaking microphones
- livestream vocal channels
- bass guitar
- occasionally drums, depending on the setup
It is less about making things “sound professional” and more about keeping levels under control without constant fader chasing.
The Main Parts of a Compressor
Most compressors on live sound consoles revolve around these core controls:
- threshold
- ratio
- attack
- release
- makeup gain
We’ll walk through each one in plain English.
1. Threshold
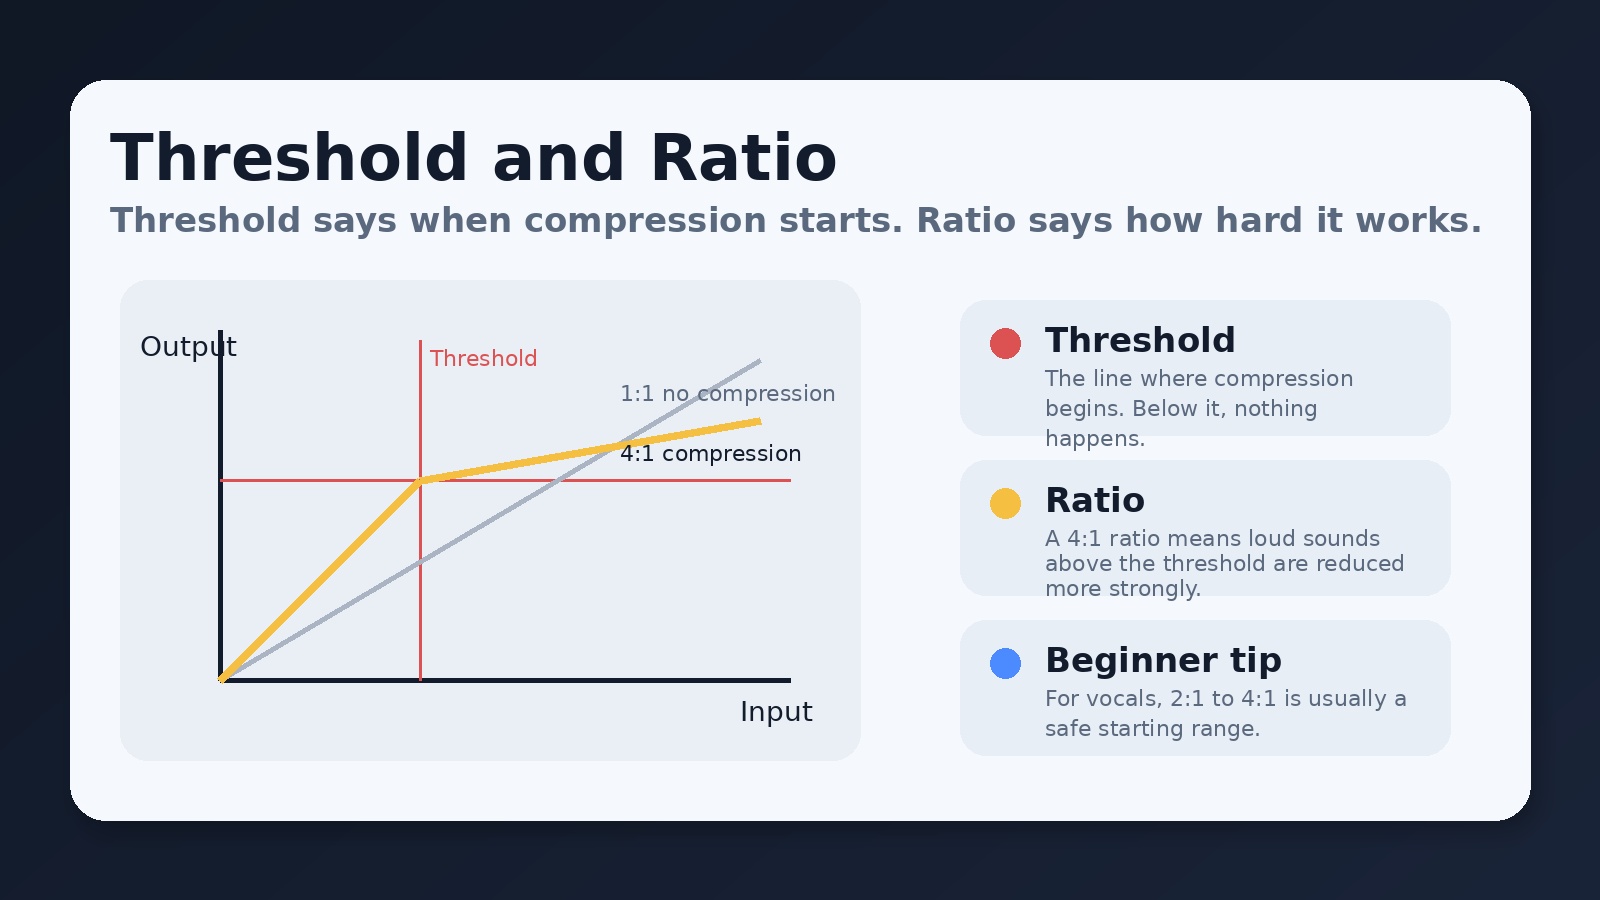
Threshold is the point where compression starts.
Below the threshold, the compressor does nothing.
Above the threshold, the compressor begins turning the signal down.
Simple definition:
Threshold = “When should the compressor start working?”
So if a vocal stays under the threshold, it passes through normally.
If the vocalist suddenly gets louder than the threshold, the compressor steps in.
Why threshold matters
If the threshold is set too high, the compressor will almost never do anything.
If the threshold is set too low, the compressor may work too often and make the sound feel overly controlled.
A beginner mistake is setting the threshold so low that the channel is being compressed almost all the time. That can flatten the life out of a vocal.
2. Ratio
Ratio tells the compressor how strongly it should react once the signal goes above the threshold.
Simple definition:
Ratio = “How hard should the compressor push back?”
Common examples:
- 2:1 = gentle compression
- 4:1 = moderate compression
- 8:1 = strong compression
How to understand ratio in plain language
A higher ratio means the compressor is more aggressive.
So:
- 2:1 feels light and natural
- 4:1 is stronger and very common on vocals
- 8:1 starts to feel heavy-handed
For most vocals, 2:1 to 4:1 is a smart starting range.
What beginners should do
Start with a moderate ratio.
Do not jump straight to aggressive settings unless there is a specific reason.
A vocal that is heavily compressed can sound squashed, dull, or unnaturally pinned in place. That is not usually what you want for worship vocals or speaking.
3. Attack
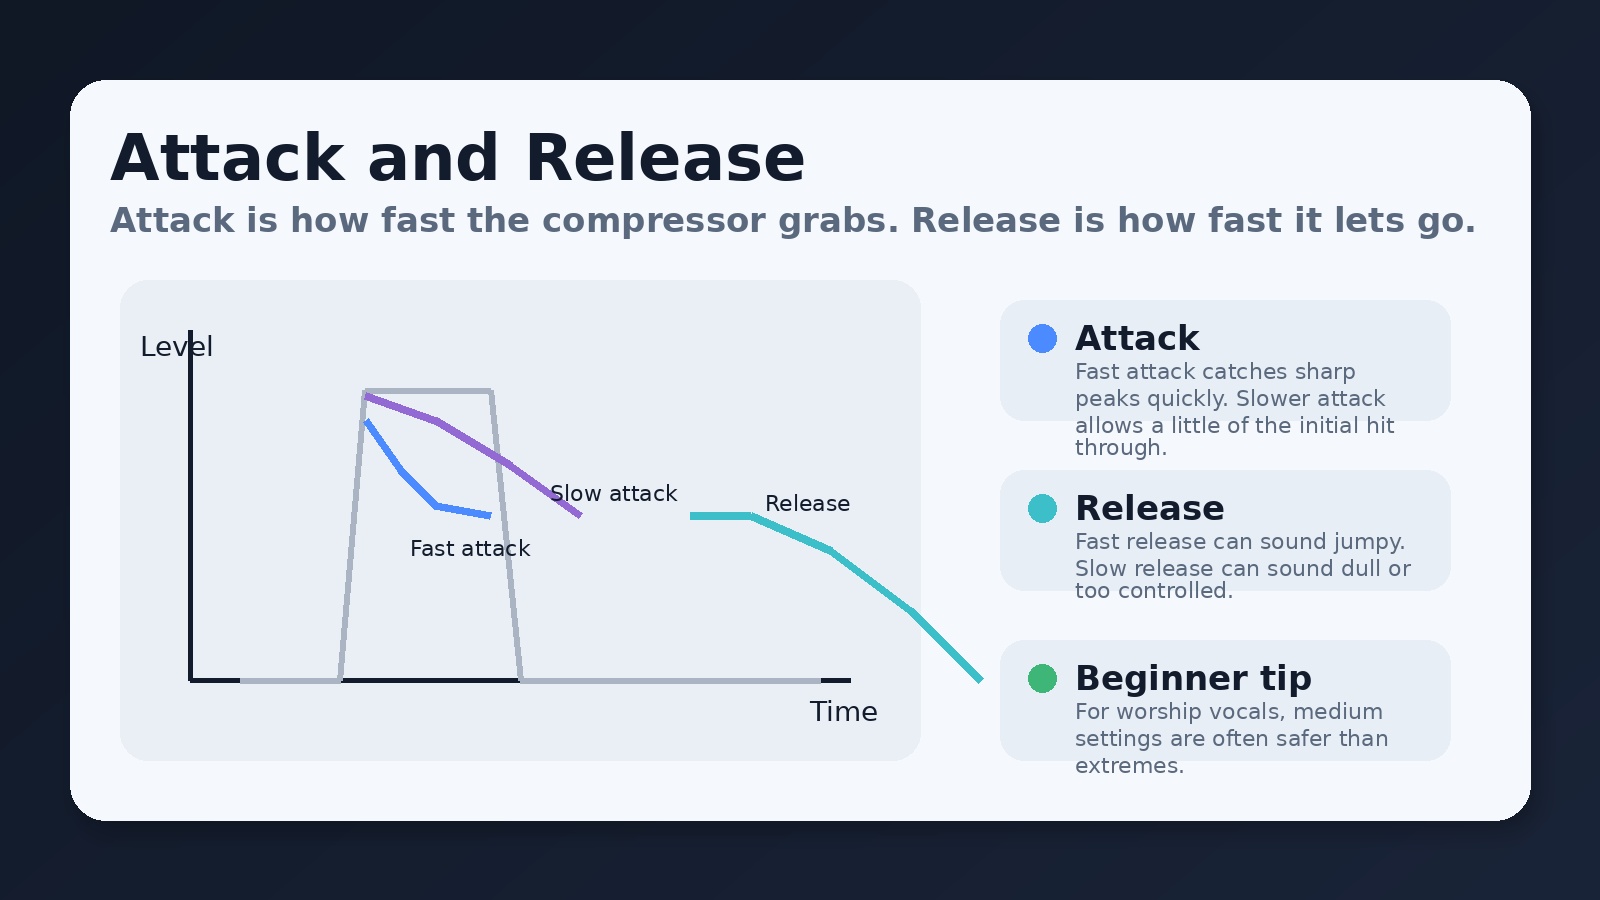
Attack controls how quickly the compressor starts reducing gain after the signal crosses the threshold.
Simple definition:
Attack = “How fast does the compressor grab the loud sound?”
If attack is fast, the compressor catches peaks quickly.
If attack is slow, the very first part of the sound slips through before compression fully kicks in.
4. Release
Release controls how quickly the compressor stops reducing gain after the signal drops back below the threshold.
Simple definition:
Release = “How fast does the compressor let go?”
If release is fast, compression ends quickly.
If release is slow, the compressor keeps working a little longer.
What that sounds like
A fast attack can help control sharp peaks.
A slow attack can preserve a little more of the initial punch or edge of the sound.
On vocals, a medium or moderately fast attack is often a safe place to begin.
If attack is too fast, the vocal can lose energy or clarity.
If attack is too slow, the compressor may miss the loud peaks you were trying to control in the first place.
A fast release can make the signal feel more lively, but if it is too fast, it can sound unnatural or jumpy.
A slow release can sound smoother, but if it is too slow, the vocal may feel dull or over-controlled.
For inexperienced engineers, medium release settings are often the safest starting point.
5. Makeup Gain
Once compression reduces the loudest peaks, the overall signal may sound a little quieter.
Makeup gain lets you raise the output level after compression.
Simple definition:
Makeup gain = “Bring the overall level back up after the peaks were reduced.”
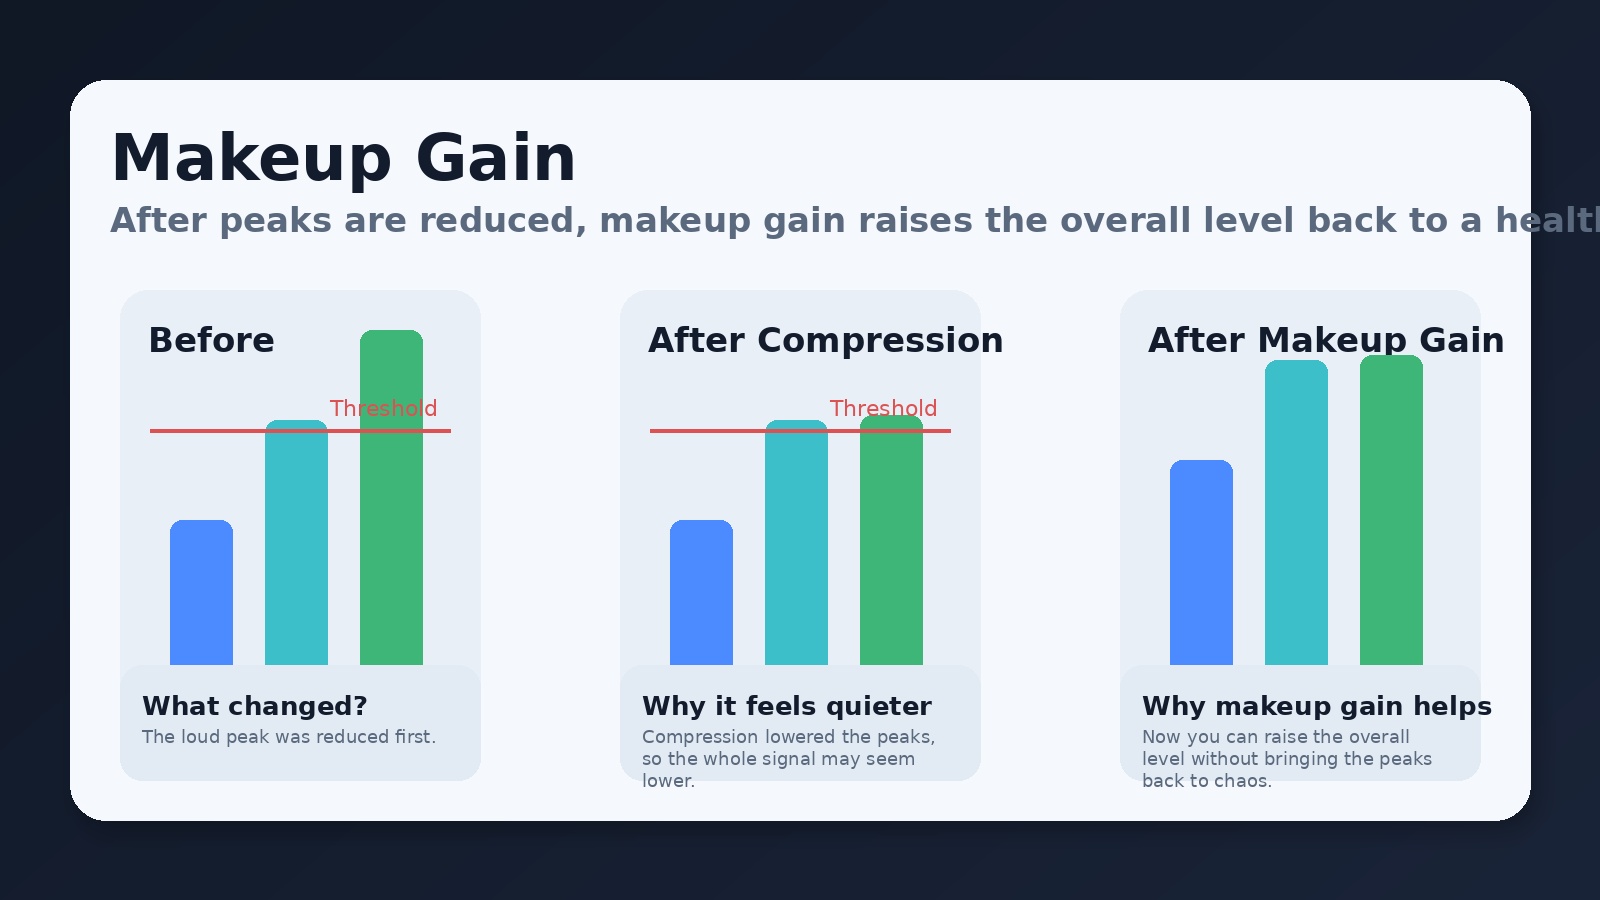
Why this exists
Imagine a singer whose loudest notes are now controlled by compression. Because those peaks have been turned down, the channel may no longer feel as loud overall.
Makeup gain lets you lift the channel back to a healthy level without restoring the original wild peaks.
Beginner warning
Makeup gain is useful, but it is easy to overdo. Too much makeup gain can:
- push the channel too loud
- create balance problems in the mix
- increase the risk of feedback
- undo the benefit of careful compression
A Simple Beginner Workflow
Here is a practical way to approach compression on vocals:
Start with the channel already set up reasonably well.
That means:
- the input gain is healthy
- the singer is using the mic properly
- EQ is not doing anything bizarre
- the fader is in a sensible place
Then try this:
- Set a moderate ratio
Begin around 3:1 or 4:1. - Lower the threshold
Bring it down until the compressor only reacts on the louder words or notes. - Use medium attack and medium release
Avoid extreme fast or extreme slow settings at first. - Add a little makeup gain if needed
Only enough to restore a healthy output level. - Listen with the compressor on and off
If the vocal sounds smoother and more controlled without sounding flat or crushed, you are probably close.
What Good Compression Sounds Like
A properly compressed vocal often sounds:
- smoother
- easier to understand
- less jumpy in volume
- more stable in the room and on the stream
A badly compressed vocal often sounds:
- flat
- lifeless
- overly dense
- strangely jumpy or “pumpy”
The goal is not to hear the compressor doing gymnastics. The goal is to notice that the channel feels easier to mix.
Common Beginner Mistakes
- Compressing too much — Heavy compression is not automatically better.
- Setting threshold too low — This makes the compressor work almost constantly.
- Using too much makeup gain — Now the channel is loud again, but in a worse way.
- Ignoring gain staging — Compression works best after the input gain is already set correctly.
- Trusting presets blindly — A preset can be a starting point, not a law of nature.
A Safe Starting Point for Vocals
For an inexperienced audio engineer, this is a reasonable starting zone:
- Threshold: low enough that only louder phrases trigger compression
- Ratio: 2:1 to 4:1
- Attack: medium
- Release: medium
- Makeup gain: small amount only if needed
Then adjust by ear.
That last part matters most. Compression is not about memorizing numbers. It is about hearing what the signal needs.
Final Thought
A compressor is not there to make a channel impressive. It is there to make a channel more controlled, more stable, and easier to place in the mix.
In audio, subtle compression is usually the winning move. Gentle settings can help vocals stay clear and consistent without sounding unnatural.
The mission is not to show off your plugin theology.
The mission is to support the message.
No responses yet